
EZOfficeInventory integrates with the Jira Service Desk so you can streamline issue tracking and lower administrative burdens.
This post demonstrates the setup for an older version. We recommend using the newer EZOfficeInventory for Jira App; read the download guide here.
1. Installation Process
For the integration to work, ensure that the Account Owner in EZOfficeInventory is also an Admin in your Jira Service Desk.
- Install the EZOfficeInventory App from the Atlassian Marketplace.
- Traverse to an issue in your Jira Account. The EZOfficeInventory App will be displayed in the pane on the right. You will see a settings page that will ask for the following:
– Your EZOfficeInventory Subdomain with the host i.e. “business.ezofficeinventory.com”.
– Your ‘Secret key’; get it from Settings → Add Ons → API Integration from your EZOfficeInventory Account. It will look like ““de2fce1ad683976d2f515d0876027994””.
- Next, log in to your EZOfficeInventory Account to enable the Jira Integration Add On. Go to Settings → Add Ons → Integrate Jira. Press the ‘Connect to Jira’ button.

- This action will require integration permissions that are provided via Atlassian. For this purpose, you will be redirected to Atlassian.
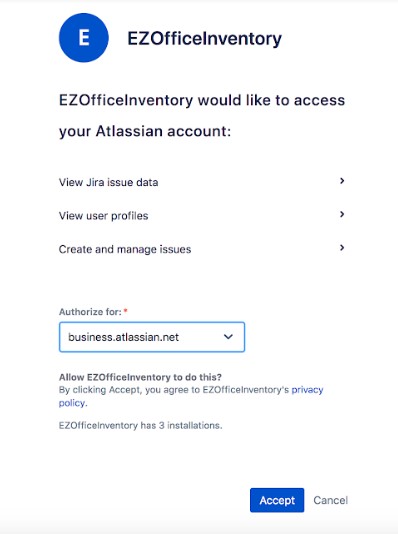
- Select your Atlassian Account from the dropdown and allow the permissions. Click ‘Accept’.
- That’s it! The integration is complete. You will be taken back to EZOfficeInventory.
2. Choosing Asset Attributes
You can also choose the Asset Attributes to show over Jira. In order to do this, go to Settings –> Add Ons –> Integrate Jira from your EZOfficeInventory Account. Click ‘Choose Attributes’.
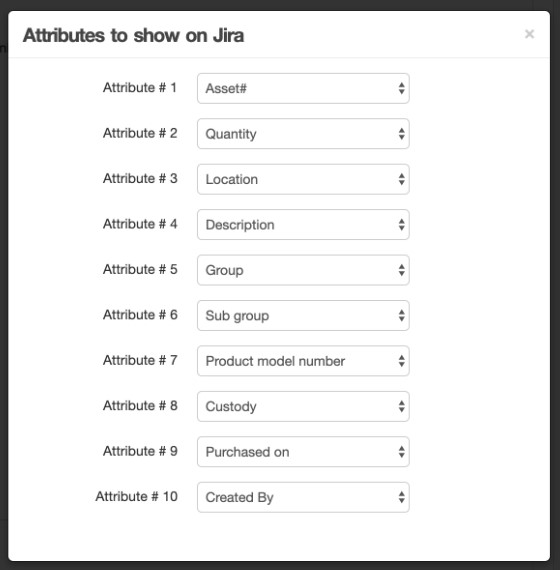
A new dialog will prompt you to make your attribute selections. Once done, click on ‘Save this view’ to save the changes.
3. How the Integration Works
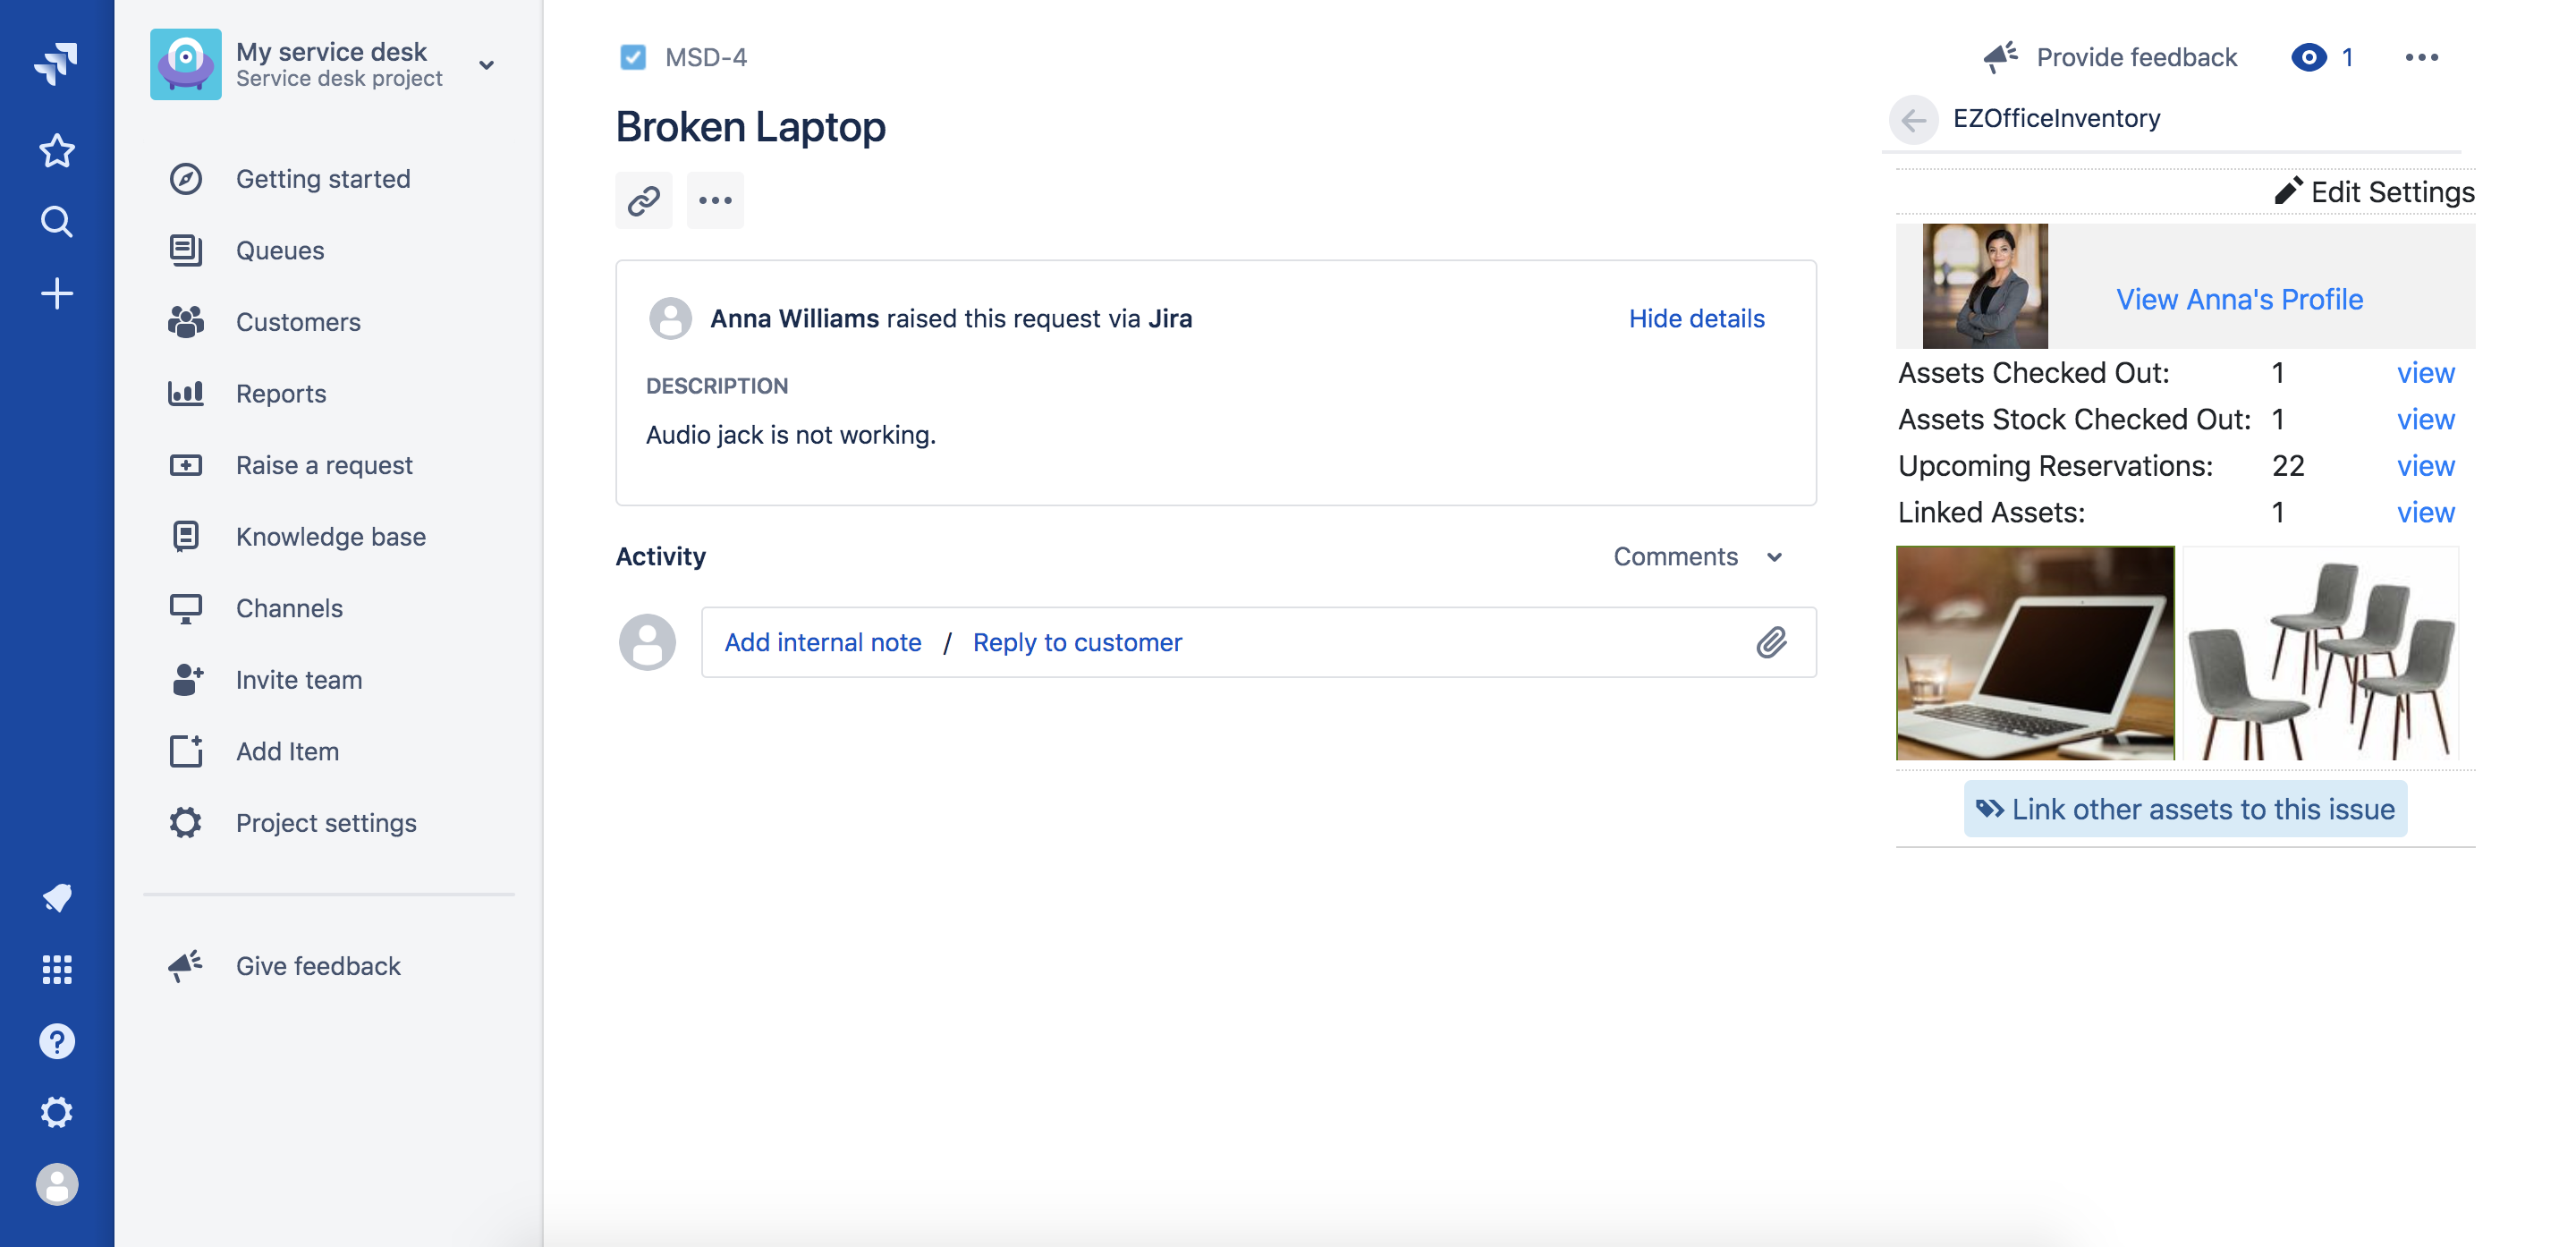
For every issue in Jira, you’ll find the EZOfficeInventory App on the right-side pane. Click on ‘Open EZO’ to expand the app window. With every issue, you will see:
- The reporter and a link to their EZOfficeInventory profile
- A link to the assets checkout out to said reporter
- A link to the assets reserved by the said reporter
- All items checked out to the reporter with their attributes.
3.1. Linking Assets with issues
Use the app to link issues with assets. Items checked out to the concerned reporter will be displayed in the app window. Based on the issue description, the current user will scroll through their list and link relevant items to the issue.
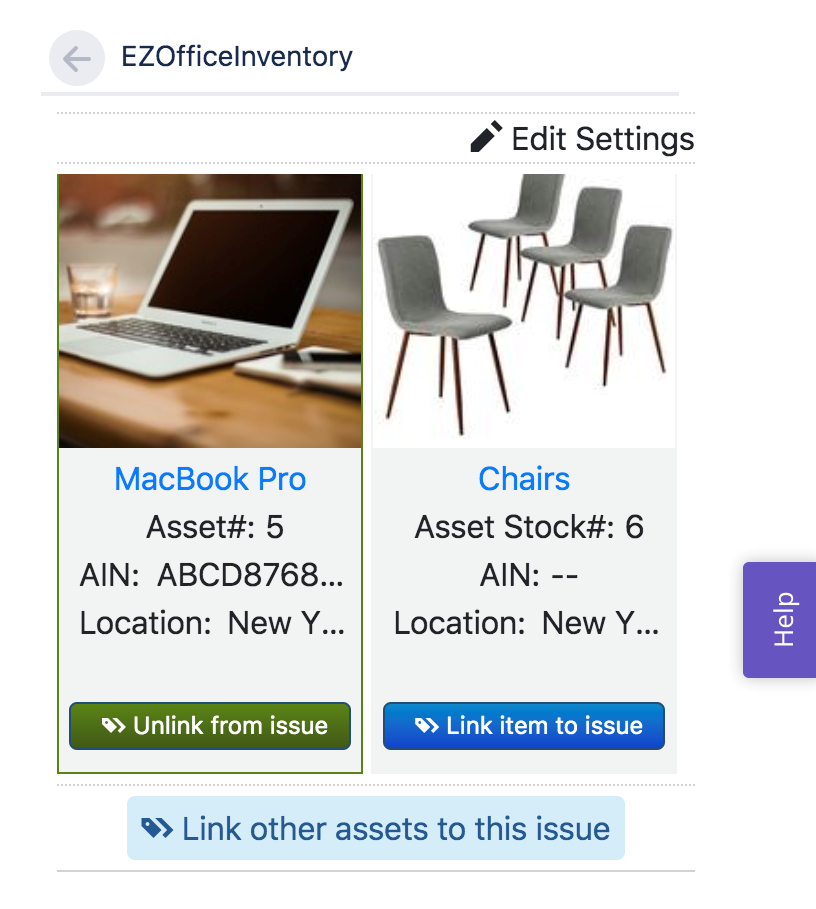
You can also link other items with the issue that aren’t checked out to the reporter. At the bottom of the app window, there’s a ‘Link other assets to this issue’ button.

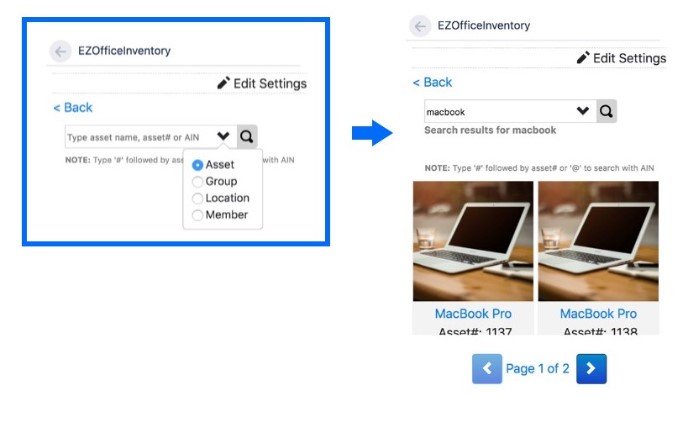
Additionally, you can look up items by asset name, asset# or AIN.
3.2. Navigating to EZOfficeInventory’s Item Details Page
All assets on this right-side pane are clickable. Clicking on the asset name in Jira will open a tab in EZOfficeInventory – the Items Detail Page.
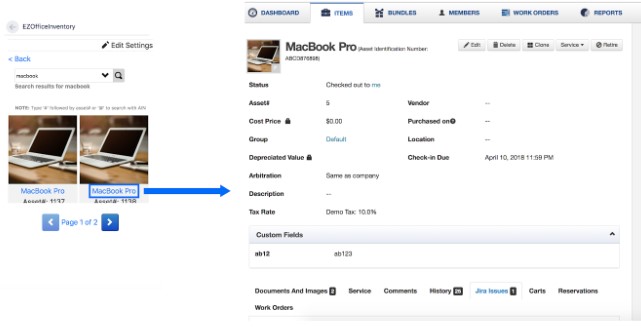
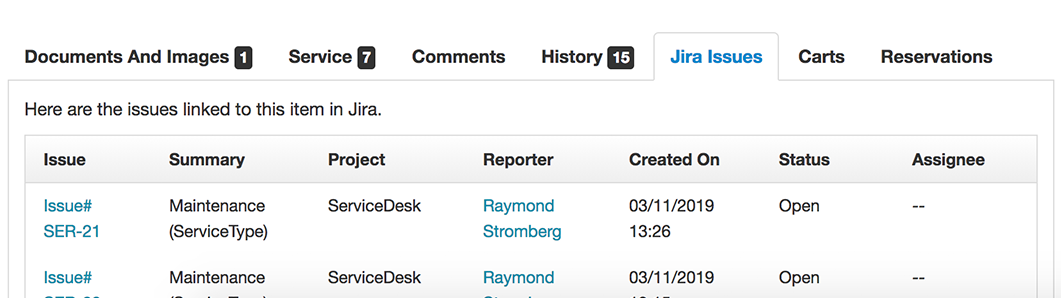
From the Item Details Page in EZOfficeInventory, scroll down and you’ll see a tab for all the relevant Jira Issues.
 4. Troubleshooting
Error 1: The reporter <your email address> doesn’t exist under Members in EZOfficeInventory. Make sure EZOfficeInventory has the correct email address
Solution: You must be the Account Owner in EZOfficeInventory and an administrator in Jira. Ensure that you’re using the same email in both the applications.
Error 2: We couldn’t find your profile <your email address>. Make sure you have the correct email address under members in EZOfficeInventory.
Solution: Jira users should exist as members in EZOfficeInventory for them to be able to report an issue.
Error 3: There was a problem accessing data.
Solution: To fix, go to your Jira Account and update the settings in the EZOfficeInventory App.
Note: Existing data will NOT be impacted by the resetting of the connection.


